Share
Pin
Tweet
Send
Share
Send
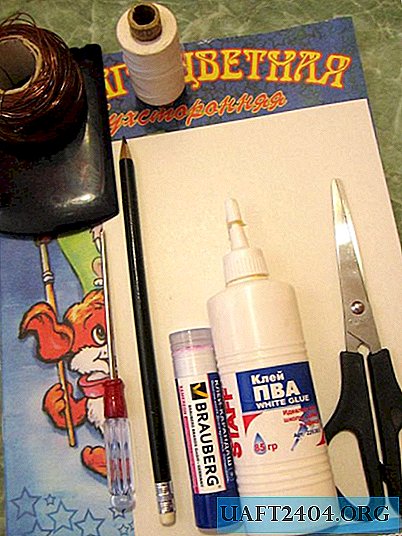
So, let's start with the list of materials we need. We will need:
Petard. I use corsairs No. 4, since they are not as expensive and rare as No. 6, they are smaller, but it is quite enough for our needs.
Energoflex with a diameter of 35 mm and a wall thickness of 6 mm. Energoflex is popularly referred to as "pipe insulation". At least, sellers in stores quickly understand what I'm looking for when I say that. Usually it is sold in pieces of 2 meters. About 9 cm of such a “tube” goes to 1 grenade.
Peas. Any
Matches. Keep in mind that 1 grenade from a box and 3-4 matches takes 1 grenade.
Sling 1 cm wide. I usually take in a sewing store black or olive. 1 grenade consumes about 11-12cm.
Rubber bands for money. You can buy at any stationery store. 1 grenade - 1 gum.
Self-adhesive oilcloth in black or any other color you like. You can buy in building materials. For 1 grenade you need a piece with an area of about 14x18cm. You can also tape
Tools in stock: thermal gun and hot melt adhesive, scissors, stationery knife, ruler and so on, which you find necessary in your work.
Having prepared everything you need, let's proceed. I divided the whole process into 4 stages:
Training firecrackers and initiation systems.
Making shells for grenades.
Assembly of all parts.
Giving the product a normal appearance (if you do not plan to use grenades in official games and are not so much esthetically sophisticated in themselves, then you can not perform step 4, but remember that pyrotechnics are allowed not only safe, but also entourage for official games).

1. Preparing firecrackers and initiation systems.
First of all, I want to say that the thermogun turned out to be a really very successful solution for assembling grenades, as it is easy to apply, cools quickly and fixes all the materials used quite well. Of course, for lack of it you can use ordinary glue, for example "moment".
So, we take a firecracker and fix 3-4 matches on top of it so that the heads of matches lie exactly along the edge of the firecrackers, speaking slightly for him. At the same time, care must be taken to ensure that the match heads are in direct contact with the flammable composition of the firecracker itself. This guarantees us 100% initiation of firecrackers when matches are ignited. Matches can be arranged along the firecracker body. In this case, we also do not forget about the contact of the heads of matches with a firecracker.

After the glue dries, we cut off the protruding ends of the matches. I use a regular garden pruner.
Next, take a sewing sling. Cut it into strips of 11-12 cm, singe off the trimmed ends to remove fluffy threads. Next, “Derbanim” matchboxes carving tealots. Then we glue tealots to the line with glue "moment". Personally, I bend and stitch the ends of the slings, which are opposite to the teaser, to form a loop. You can then pass a ring into it or fasten a carabiner in it in a pouch for initiating a grenade with one hand.
This system is not safe !!! When a grenade falls from a height, it can work independently !!!
Having made the number of “tealots on the sling” we need, we fasten them to the firecrackers as shown in the figure:

Please note that you need to firmly press the teal on the firecracker and the heads of the matches, but not too tightly so that when pulling out the matches are lit. Attention! Take special care at this stage, because a randomly initiated firecracker cannot be put out already! Also, do not check the reliability of fastening the tee to a firecracker by trying to pull the sling!
2. We make the body of our grenade.
To do this, take a pipe of insulation and cut it into pieces. Trimming is long, I get about 9 cm, but you can measure it yourself by attaching your firecracker and taking a tolerance of 1.5 cm for the bottom and top of the grenade. Then, on each workpiece from the outside, cuts should be made 3-5 mm deep across the entire surface of the body. This will allow corsair 4 to more easily tear the shell.
After cutting the bodies, we cut out circles for the bottoms and caps of the grenade from the same energy flex. The diameter of the circles is equal to the internal diameter of the grenade body.

After that, we glue the bottom of the grenade:

Now we make slots on the prepared mugs for pomegranate pods. In this slot we will extend our sling with teal.

On this, perhaps, the component preparation phase is over. We proceed to the assembly of the grenade.
3. Assembly of parts.
We take a firecracker with a sling and tealot attached to it and place it on the bottom of the hull. In order to fix it there, we first make a drop of glue on the end of the firecracker, which solidifies the firecracker inside the grenade body.

Next, we fall asleep peas evenly distributing it around the firecrackers. Thoroughly morning it so that the peas do not rattle inside the grenade.

Then close the blanks with lids. We seal the lids and allow to dry.
All, in fact, our grenade is ready. Now we just have to bring it into a divine form :)
4. Giving the product a normal appearance.
Why am I using self-adhesive film? Because as a result of numerous attempts to paint the energoflex, I came to the conclusion that this is too useless exercise. Energoflex, in fact, is a cellophane sponge and the paint does not hold on it and instantly flies around - just put the grenade in the pouch ...
So, we take the sheets of film, cut it 14 into 18cm. Further, I cut each such sheet into 2 parts (again, to facilitate the firecracker "breakthrough of the hull"). Then I take a grenade and glue it with a film so that its ends come out over the edge of the grenade and they can be bent to its top and bottom.

We cut the protruding ends of the film into strips and bend to the bottom and cover of the firecracker.

Source: 40cdo-rm.ru
Share
Pin
Tweet
Send
Share
Send