Share
Pin
Tweet
Send
Share
Send
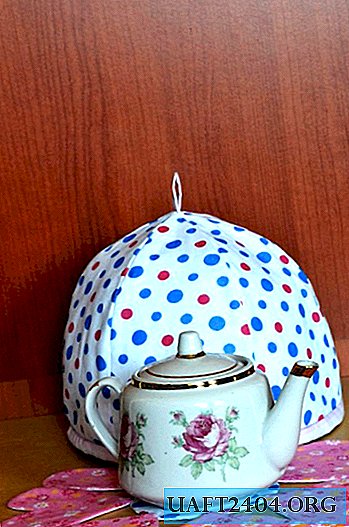
In the cold season, the heating pad and tea towel will help to keep your tea warm. The set is easy to execute, does not require special skills and expensive materials. If you do not have a sewing machine, then it is quite possible to do with hand seams. Sizes of finished products. Napkin diameter 28cm. The height of the heating pad is 23 cm, the circumference along the bottom of the teapot is 72 cm.
For work you will need:
- a piece of fabric with polka dots for a heating pad 90 * 30cm;
- a piece of fabric for heating pad lining 70 * 30cm;
- a piece of fabric in a flower for hearts 70 * 13cm;
- a piece of plain fabric for hearts 70 * 13cm;
- a piece of fabric for inlay and for "tail" 75 * 6cm;
- a piece of synthetic winterizer about 50 * 90cm.
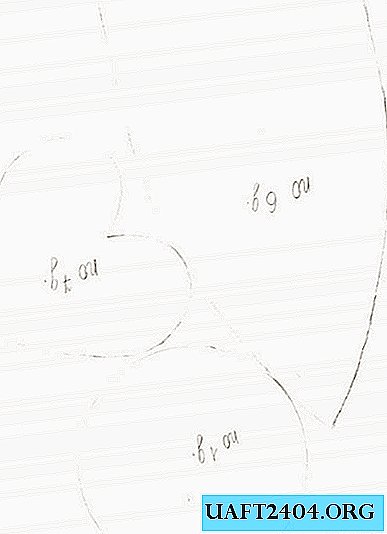
Remaking a pattern. It is given in real size and with allowances for seams. We transfer all the details to the fabric, cut out.
Expand in detail all the workpieces for assembly.

Sew a heating pad. We work with polka-dot fabric and synthetic winterizer. Sew in a single unit of 3 "petals". We make a strip 8 cm long for the "tail".

With a needle, we pin a tail to the top of one of the petals.
We connect two assembled parts with one line. All the synthetic winterizer, which went beyond the main details, is carefully trimmed.


The front side of the heating pad is ready.


In the same way we sew a lining. First, we connect three “petals”, then with one line we connect the two parts obtained into one.

Well iron the resulting workpieces. In this case, the synthetic winterizer will be compacted, and the front billet will become stiffer.


We connect the lining to the front of the heating pad. We fix two vertices with a pin. We evenly place the lining inside, at all seams we fix two blanks with pins.

We measure the bottom circumference of the resulting workpiece. We cut for stripe a strip of the desired dyne and a width of 6cm.

Stitch the strip into a ring, smooth it with the wrong side inward and iron it well.

With the help of pins, we pin the tape to the front side of the main workpiece. Pay attention to how to pin the tape correctly: the tape cuts to the workpiece cuts.

Sew the neckline to the width of the foot. With the help of an iron, we unscrew the trim and sew with hidden stitches to the lining of the main part. You can also sew on a typewriter, but then a stitching seam will be visible on the face.


Iron the resulting heating pad again.
Getting to the napkin.
We collect hearts and a circle. On the width of the foot, we grind all the details, leaving a 2.5 cm hole for turning the parts out. When stitching, pay attention to the collection sequence of the “sandwich”: synthetic winterizer, lining, main fabric. Cut off excess padding polyester. We turn out the details. Spread the seams and synthetic winterizer well. Sew the eversion holes with hand-sewn stitches. Iron the parts.


Lay out the future napkin on a flat surface. Hearts should go 0.5 cm into the circle. Chip together the hearts and hearts with a circle. Using a handheld blind stitch, connect all parts of the napkin. Take a good iron again.

The napkin is ready.

The teapot set is ready. Now you can brew a large portion of tea and are not afraid that it will quickly cool down. Helpers made by your hands will help to keep the warmth and aroma of tea for a long time.


Share
Pin
Tweet
Send
Share
Send