Share
Pin
Tweet
Send
Share
Send
To make such a daddy, we need to take:
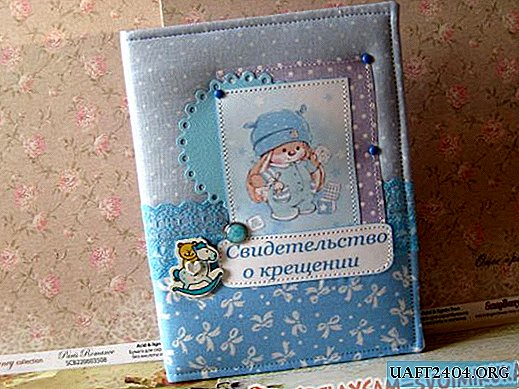
• Binding cardboard two sheets of 14.2 * 19 cm;
• A small sheet of watercolor paper;
• Scrapbook paper in blue-violet coloring sheet 30 * 30 cm;
• Fabric 100% cotton light blue in small peas and blue in a white bow;
• Circle cut down blue, light blue flags;
• Pictures with Mi Bunnies;
• Wide 4 cm blue lace;
• Blue and blue brads of different sizes;
• The inscription printed "Baptism Certificate";
• Wooden large button bear on a horse;
• scissors;
• Ink pillow blue-green;
• Ruler with a pencil;
• Glue stick;
• Sintepon;
• Double-sided tape;

We take sheets of binding cardboard, put them on the table 14.2 * 19 cm. From the watercolor paper, cut off a strip of 6.5 * 19 cm, divide it 3 * 0.5 * 3 cm, make bends with scissors and a ruler.


Now, with the help of this watercolor sheet, we need to interconnect binding blanks. We spread with a glue gun, press and glue the base of the cover. Cut the sheet of padding polyester to turn the binder blank.


With double-sided strips of adhesive tape we glue the synthetic winterizer on the base.


We cut two pieces of fabric with stocks on all sides for a turn. And cut the strip of lace to the width of the fabric.


We sew the fabrics together, then on the front side we also sew lace.


Now we turn the prepared piece of fabric face down. We apply a detailed binding blank, wrap and bend, we will try on where to sew the picture and cards.


Immediately measure out the inside of the folder itself. We take a sheet of scrapbook paper we measure in width 14 * 0.5 * 14 cm, we measure out 18.8 cm in height. We also measure out 11 * 14 cm cut-out paper for the pocket from the same sheet. Where the distance is 0.5 cm, we make bending lines.


We glue the pocket along the edges on the right of the inner workpiece, and glue the bunny on the left. We try on the cover a card that is left from a sheet of paper, a circle, a picture with a hare and an inscription.


We first attach the card to the machine, then the circle with the bunny and the inscription below. With regards to the inner workpiece, we sew a pocket and a picture. Now we glue the fabric to the cover from the inside with glue stick.


Well level the corners.


Now, from the front of the folder, flash the cover along the edge. We insert brads in different places.


We also sit on the brads and a large wooden button with a horse. Now we gently spread the cover inside with glue stick and glue the scrap with a pocket into the scrap. Dry the unfolded cover until the glue completely dries.


Daddy is completely ready, you can put your testimony into it! Thanks for your attention!


Share
Pin
Tweet
Send
Share
Send