Share
Pin
Tweet
Send
Share
Send
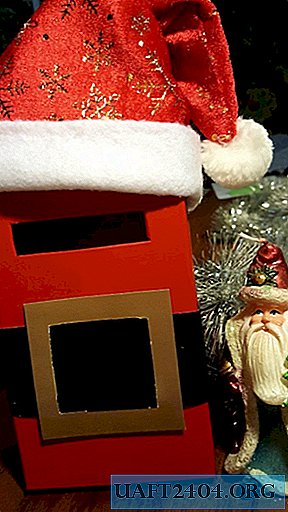
We propose to create with your own children the necessary and useful craft - Santa Claus mailbox.
For this master class we need materials:
- - a box from under shoes (its size depends only on your desire).
- - decorative film (can be replaced with colored paper).
- - cardboard of black and gold color.
- - scissors.
- - stationery knife.
- - glue.
- - pencil and ruler.

Step-by-step master class.
First of all, we clear the table from unnecessary items and proceed.
1. On the cover of the shoe box, draw a slot for letters. Let me remind you that the smallest envelope is 11 cm by 22 cm. If you intend to use the box of Santa Claus for its intended purpose, it is necessary to take this into account. If the slot will have a purely decorative function, its size does not matter.
2. On the drawn lines we make a cut with an office knife.

3. Mark the necessary area of the decorative film for the bottom of the box. Remove the paper from the film and carefully glue the box. The advantages of the film are that if something did not work out, it can be removed and re-glued. Be sure to squeeze out all the bubbles with your hand, otherwise it will be ugly.


4. The same actions are performed with the top cover. Carefully pasting it with a red film. It should be noted that instead of decorative film, of course, you can use red paper. We glue her the whole box.
5. We make a cut with a clerical knife and bend the edges.


6. We make a belt of Santa Claus or Santa Claus - as you like. We take black cardboard and cut out a strip. We calculate the length of the strip so that it bends into the inside of the top cover. Bandwidth at your discretion. In this case, we used velvet paper. She has pros and cons. It always looks great, but the edges and corners tend to dangle over time. Only your preferences are important here.

7. We make a plaque. On the back of the cardboard we mark with a ruler and a pencil how the plaque will look. See photo.

8. Cut out the plaque from the gold cardboard with scissors or a stationery knife, whichever is more convenient.

9. Pass the black cardboard belt through the gold plaque and fix it with glue, as shown in the photo. Glue only on the inside of the top cover of the box.

10. Putting it all together. Decorate with a cap.


So our craft is ready. DIY Santa Claus holiday mailbox is ready. This Christmas craft can be taken to kindergarten or school. She will definitely please both children and adults, because she resembles Santa Claus himself in a red coat with a black belt.
Share
Pin
Tweet
Send
Share
Send

