Share
Pin
Tweet
Send
Share
Send
In fact, this device is quite simple, and will not cause difficulties in manufacturing, even in an ordinary apartment. But the benefits from it will be quite tangible, and maybe even some of the ham enthusiasts will push to seriously manufacture such equipment.
Antenna Specifications
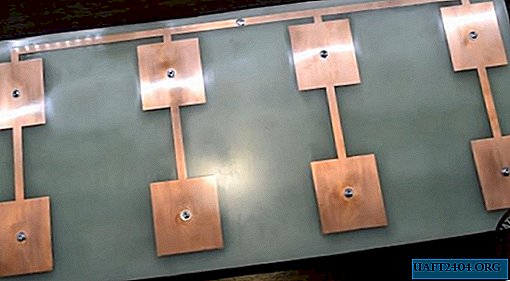
The panel antenna consists of 2 main parts - a reflector and vibrators. The line of vibrators is connected by a common contact, from which a coaxial cable is output leading to the socket of an external Wi-Fi router antenna mounted on the back of the device. The antenna works as an amplifier, which can be judged by comparing the signal power from a standard router antenna (the author used tp-link TL-WN722N) - 5db, and from the FA-20 - 22db.
Necessary materials:
- One-sided foil textolite or getinaks, 430x200 mm, thickness - 1.5 mm;
- A piece of tin (best galvanized), 435x205 mm, thickness 0.5-1 mm;
- Television coaxial cable RG-8X 50 Ohm;
- A template for a drawing of antenna vibrators printed on vinyl film;
- Photoresist
- Chlorine iron for etching circuit boards;
- Aerosol spray can for textolite;
- Soda, acetone or alcohol;
- Hardware: 3 mm bolts - 12 pcs., Nuts - 32 pcs.


Instruments:
- Drill with a cutting disc for cutting getinaksa;
- Drill with a drill 3-3.5 mm;
- Soldering iron with solder;
- Paint knife, scissors;
- Pliers, scissors for metal;
- Construction rubber roller for rolling films;
- Tray for etching the antenna board;
- A piece of glass and an ultraviolet lamp for photolithography;
- Hairdryer or iron for heating the photoresist;
- Sandpaper-nulevka;
- Hot glue gun;
- Core, hammer;
- Metal ruler for marking holes.
Making a Wi-Fi Antenna
Stage One - Making the Vibrator Panel
We mark out a sheet of foiled textolite to the size of our antenna, and cut out a cutting disc with a drill. This procedure can also be performed with an ordinary paint knife, making cuts along the marking line on both sides of the sheet, and then breaking them off manually.


On a transparent film for inkjet printers, print the antenna vibrator pattern. It will turn out from two sheets, which are then easily connected together.


For etching using photoresist technology, it is necessary to prepare the foil side of the getinax, stripping it with null. Degrease surfaces using acetone or alcohol.


We place the photoresist film on the getinax, cutting it in size with scissors. We remove the protective layer and glue the photoresist, getting rid of air bubbles by rolling with a rubber wallpaper roller.


After that, we apply the film of the vibrator template, and cover it with ordinary glass. To illuminate the photoresist, we use an ultraviolet lamp. The exposure time of different manufacturers of this material is different. The author took 5 seconds for his film, ordered from China. for each processed area of the board.


Now it is necessary to additionally warm up the photoresist so that it adheres firmly to the surface of the getinax. We remove the template, a sheet of glass, and heat the film with a hairdryer or iron through the paper. Remove the upper protective layer of the photoresist.


We wash off the unlit photoresist in a solution of baking soda, placing a getinax plate in the bath. After a few minutes, we clean off the remnants of the film with a used toothbrush.


Getinax is ready for pickling. We dilute ferric chloride in warm water, and dip the plate into a container with a solution. It must be stirred occasionally.


We saturate the old alkali solution with soda ash, and place a plate in it to get rid of the remaining photoresist. The resulting board is washed with plain water.


We mark the centers of the rectangles of the vibrators on the board, and core them for drilling. The hole must be made under the mounting bolts of 3 mm. The author used a step or precision conical drill, which is convenient to remove burrs.


Stage two - prepare the reflector
From a piece of galvanized sheet, the most resistant to corrosion, we cut a copy of our vibrator plate. The holes for fastening the bolts can easily be transferred to tin, making the notches with the same drill. We drill holes on the tin through a wooden lining.


We tighten the bolts with two nuts on the back of the plate, making the necessary gap between the reflector of 3 mm, and the total distance between the vibrators and the reflector is 6 mm. We fix the tin with the help of the third nut.


In the upper part of the reflector, we make a hole for the coaxial cable, the central core of which needs to be soldered to the vibrator plate, and the braid to the reflector.
The other end of the cable is soldered to the place of the external antenna to the router. We attach it to the reflector on the back of the antenna with hot glue.


The front side of the vibrator board is protected from oxidation by a colorless aerosol varnish.


For home use, this antenna can be placed on the windowsill or on the balcony. If you plan to use it in outdoor conditions, any bracket leading to the mast on the roof or outside the window clings to the reflector without difficulty.


Share
Pin
Tweet
Send
Share
Send