Share
Pin
Tweet
Send
Share
Send
One of the significant shortcomings of powerful asynchronous electric motors is their "heavy" start-up, which is accompanied by huge initial currents at this moment. As a result, a large power surge appears in the network. Such "failures" may adversely affect the operation of electronics or other electrical units operating on the same line.
For a soft start, use the star-delta switching circuit. At which, at the beginning of start-up, the engine is switched on by a star, and when the motor shaft spins up to working revolutions, the electronics switches it into a triangle circuit.
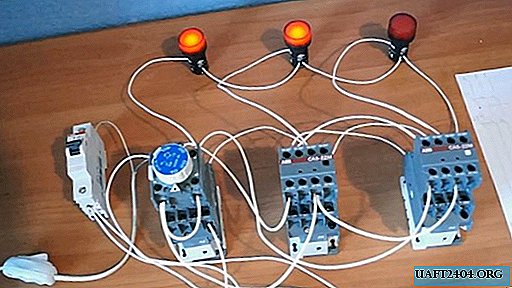
I will show how to assemble a start-up and control unit, which will not only control the start and stop of the engine, but will also change its start-up patterns at start-up.
Will need
To connect, we need:
- 3 starters, to control the power unit;
- prefix with time delay - adjustable time relay;
- 2 consoles with normally open and closed contacts;
- Start and Stop buttons;
- 3 bulbs, for a visual view of the starter;
- single pole circuit breaker.

Scheme
Connection is carried out according to a pre-drawn diagram.

The diagram shows the power unit and control circuit. The power unit includes:
- opening circuit breaker;
- 3 powerful starters controlling the star-delta switching power circuit;
- electric motor.

When turned on according to the "star" scheme, the first and third starters work, when turned on according to the "triangle" scheme, the first and second starters work. Due to the lack of connectivity to the 380 V network, we restrict ourselves to a visual examination of the operation of the system without engines. Control circuits include:
- single pole circuit breaker;
- Start and Stop buttons;
- three starter coils;
- normally closed contact;
- normally open contact;
- time relay contacts.

Putting together a circuit to demonstrate the operation of an automatic system.

In parallel with the coils of the starter, signal lamps are connected so that you can clearly see the work.
System check
We turn on the circuit breaker, thereby supplying power to the entire circuit. Press the "Start" button to start the electric motor. And the first and third starters were attracted to us, the lights 1 and 3 lit up - meaning that the engine was turned on according to the "star" scheme.

After a while, the timer is triggered, the first and second starters are attracted, lamps 1 and 2 light up - which means the engine is connected according to the "triangle" scheme.

The time on the console can be adjusted from 100 milliseconds to 40 seconds. depending on how fast the engine gains speed.

Press the "Stop" button and everything stops.
When connecting the motor, the connection of the motor phases must be taken into account. In this case, phase A comes to the beginning of the winding, phase B to the end of the winding. Phase B should come to the beginning of the second winding, phase C to come to the end.
Be sure to watch the video, where the process of working and connecting the entire circuit is described in more detail and clearly.
Share
Pin
Tweet
Send
Share
Send


