Share
Pin
Tweet
Send
Share
Send
You can probably buy such a business card bookstore in a store, or you can do it yourself. In this case, it will be more functional, nicer, more interesting. And how girlfriends will envy!
For the manufacture of such a book you will need the following materials:
1. Self-healing table mat.
2. Dummy knife or scissors.
3. Metal ruler and pencil.
4. Glue stick or double-sided tape.
5. Thin cardboard size 9 * 13 - 2 pcs., And 3 * 13cm - 1 pc.
6.Fabric (cotton) 18 * 27cm
7. Thin foam rubber measuring 9 * 13 - 2 pcs., And 3 * 13 - 1 pc.
8. A sheet of color double-sided paper for scrapbooking.
9.Two pieces of satin ribbon about 18-20cm long
10. A button, a flower made of paper or other decorations.
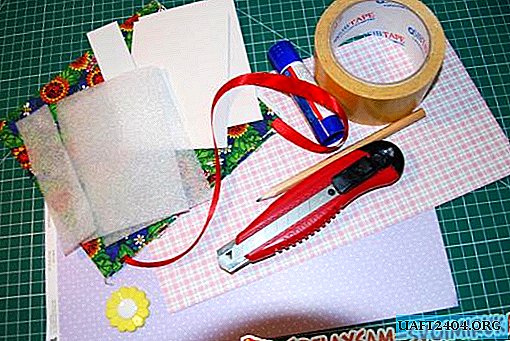
Glue cardboard with foam using glue stick. These will be blanks for the crusts of the book.

We lay these blanks down with foam rubber on the wrong side of the fabric in the manner shown in the photo. We cut the fabric with a margin of 3 cm from all sides.

We well coat the edges of the cardboard with glue-pencil, bend the fabric on it and glue it.


Now we sew the edges of the resulting soft textile cover on a sewing machine. The machine line should go along the perimeter of the cover, departing from the edge by 3-5mm and in the middle to indicate folds. Machine stitching emphasizes the softness of the cover.


To hide the rough work, hide the edges of the fabric, the machine line, glue colored paper for scrapbooking on the wrong side of the cover. The perimeter paper should be 2 mm smaller than the cover, i.e. 12.8 * 20.8cm.


Now let's make the inside of the business card book. To do this, take a sheet of paper for scrapbooking, cut it into two strips 12.5 * 30 cm in size. Glue two strips into one so that it is long. We will fold a long strip in the form of an accordion. Each section of the accordion should be 8.5 * 12.5 in size. These will be the pages of the book. If desired, the accordion can be made shorter or longer, then there will be less or more pages. On each page of the accordion you can stick a pocket or envelope in which you can put a calendar, business card or notes for recording. It already depends on your taste and desire.

It remains to attach the strings and decorate the card holder. To do this, take the ribbon, cut it in half, set the edges on the lighter so that it does not open and glue the ribbons to the cover as shown in the photo.

To hide the ends of the ribbons, decorate the booklet with the remnants of scrapbooking paper and attach a flower. I glued it with Moment glue - the gel is transparent. Here is such a book-card holder, I did.

Enjoy your creativity!

Share
Pin
Tweet
Send
Share
Send

