In this review, we will talk about a unique metal structure - a rocket furnace with a folding table. It will be equipped with wheels for easy transport. Despite the certain volume of work, the benefits of such a product are amazing! In addition, it is compact and convenient.

In a garden house or in the country - such a stove does not require much space. You can easily put it in the trunk of a car, taking it with you on a picnic, fishing or hunting. On this stove, you can quickly cook steaks, fried eggs, bake vegetables, boil water and even boil soup. In this case, a minimum of fuel material is needed, dry branches and chips are suitable.
Can't wait to get started? Then we begin! We stock up on the following details: profile pipe, metal plates, pins, bolts, nuts, screws, hinges. From technical devices you will need a grinder, welding, a drill, a vice, a hammer, a lathe for wooden products.
The main stages of work
First, cut the profile into three parts so that they fit together, forming the basis of the structure. The approximate length of the parts is 60, 40 and 30 cm. These will be respectively: a chimney, a wood firebox and ventilation (blowing). In the place where the chimney will be attached to the furnace, we cut a hole with a grinder, retreating slightly along the edges.

We weld three plates inside the blower. We connect by blowing and a chimney. And then you need to weld the furnace to the chimney, clean the seams.
Now we’ll make a rotating cover for the ventilation hole: we cut out the plate according to the size of the end of the pipe (the plate should go inside freely), take a metal rod, after bending it with the letter “G”, we make and install the mount.

To do this, drill holes in the plate and pipe. Through two holes in the plate, we attach it to the pin, to which then part of the bolt with a thread and a pre-cut head is then welded. It will be a rotary knob. Insert the pin into the hole itself, wind it onto the thread holding the nut.

A further task is to make the cover a slightly different shape. She must have an edge. To do this, use a metal plate and a pin bent with the letter "G", which must be welded to the lid itself. And it should be "put" on the loop.
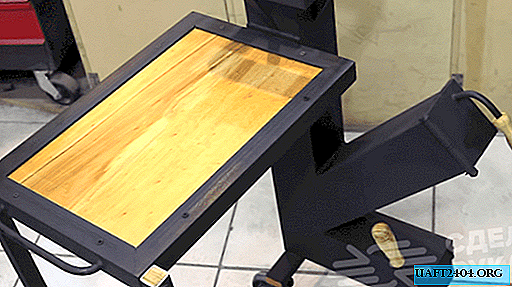
Making a table
From a smaller profile we will make a table. Take the wheels with mounts. If there are no fixtures at hand, or they are not suitable, we will make them ourselves and combine the resulting structure with blow-welding. On the chimney, from which not only smoke, but also heat will go out, we will weld a platform for installing a pan or pan.

The platform is made of corners in the shape of a square, held on side plates or pins welded to the chimney. To make a table you will also need a board. The table is attached to the chimney using hinges welded to it. We “supply” the table with a handle and rotary legs.

We place a board inside the corners of the table, and at the ends of the profile we hammer in small sticks to give an aesthetic appearance. We cover the metal parts of the rocket stove with refractory paint. For pens, we grind two wooden tips, put them on glue.
We process the board, wooden handles and bars with special impregnation. We fasten the board to the frame from the corners using self-tapping screws. At the end, we make a poker for ash removal. Homemade rocket stove is ready.