Share
Pin
Tweet
Send
Share
Send
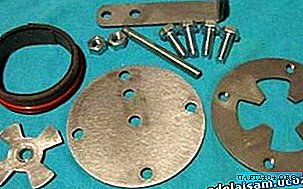
We proceed to the assembly of the mechanical part of the generator. Details of the generator are shown below. All of them are made of steel. For the ring, a tape made of transformer steel was used, but you can do with a steel sleeve.
Pass the wire from the coil into the hole in the base.

Having fixed the nut on the axis, we pull the package from the corner, the round base plate, the coil and the cross-shaped magnetic circuit with another nut. See the pictures below.


We install a steel magnetic circuit in the form of a ring on top of the coil and insert 4 bolts. Bolts with a diameter of 6 mm and a length of 20 mm.

Install the upper plate by pulling it with bolts. Tighten the bolts effortlessly so as not to damage the threads on the plate.

Pulling the central nut, we press the cross-shaped magnetic circuit to the coil so that it does not protrude beyond the plane of the upper plate.

On this, the stator assembly can be considered complete.
Getting to the assembly of the rotor. We need 8 pcs of permanent magnets and bearings.

Next, you need to mark the places for attaching the magnets. To do this, draw a drawing template

And putting it on the rotor ...

marker mark the place of attachment of the magnets.

Rotor magnets should alternate poles. Therefore, before their sticker you need to mark the poles of the same name, for example, with a marker. The easiest way to do this is by collecting all the magnets in a column. In this case, all poles of the same name will be oriented in one direction.


Place the magnets on the rotor, alternating between the poles.


After installing the magnets, you can glue around them with glue for final fixation. However, magnets even without glue hold well.
Mount the rotor on the axle and secure it.
Actually, with the mechanics, finished. Now, turning the rotor by hand, you can get 3 ... 4V AC output voltage. After the rectifier, get 7 ... 9V.
We assemble the rectifier and voltage multiplier twice. Its circuit is shown in the figure below. As diodes, you can take any diode for a current of 1 A or higher and a voltage of at least 50V. Electrolytic capacitors 47.0 microfarads x 50V, or any larger capacitance.

If multiplication is not necessary, then we connect the capacitor between the plus and minus of the output and remove them from the diodes.
In the absence of a soldering iron, the rectifier can be assembled as shown in the figures below.


We connect the generator to the rectifier at the AC points.

And connect the multimeter to the output.

With fast rotation at the output, you can get almost 40 V without load.
In the future, this generator can be connected to various turbines.
For example, with a vertical axis.

Or, having made the blades of thin aluminum, assemble a spinner with a horizontal axis of rotation.


The drawing of the blade is shown in the figure below. All dimensions are in inches, 1 inch = 25.4 mm.

Actually, that's all. Then you can use this windmill and generator as you wish.
Good luck
Share
Pin
Tweet
Send
Share
Send

