Share
Pin
Tweet
Send
Share
Send
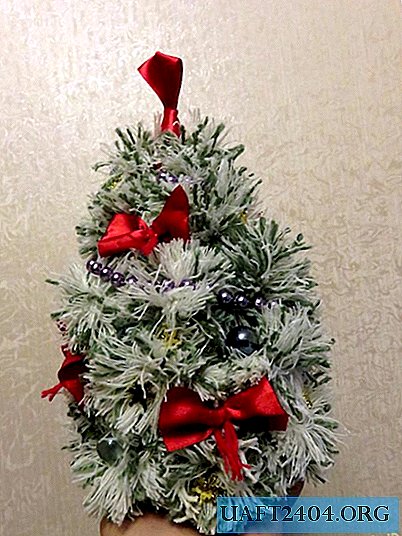

By the new year, you always want to have a brand new elegant Christmas tree-beauty. You won’t be able to change a large indoor tree so often, but small desktop Christmas trees that can be made with your own hands, and you can update them for each holiday season.
A very cute Christmas tree is obtained from pompons. The technology is painstaking and requires some time and effort, but the result will please you.
Prepare the following for work: green and white yarn (you can use leftovers even if the ball consists of pieces of thread), a pattern for winding threads for making pompons, a plastic bottle of 1.5 - 2 liters, glass marbles, Christmas tree beads, red satin ribbon, crochet hook, scissors, glue gun, construction knife.


The longest stage in creating a Christmas tree from pompons is the manufacture of the pompons themselves. There should be quite a lot of them, the Christmas tree should be voluminous. We start by combining threads. Green-white melange can be performed, both with a predominance of white, and with a predominance of green threads. Depending on this, the Christmas tree will be either green or more snowy.


We wind the threads tightly on the base template for the pompom. In our case, a small notebook is selected, it is even easier to use a piece of thick cardboard. Then tightly and tightly we tie the wound threads in the middle. Then we cut the threads on one and the other side and fluff each pompon. For a small Christmas tree, approximately 25 cm in size, there should be an average of 25 to 30 pomonas.


The basis for the Christmas tree is made of a plastic bottle, which should be a volume of at least 1.5 - 2 liters. The bottle should be with a cap. We trim the upper part, at a distance that determines the height of the Christmas tree. In order for thin plastic to hold its shape better, we carefully and evenly heat the edges of the cut on a flat surface, iron or the bottom of a heated pan. As a result, the edges are twisted, forming a dense rim.

From any yarn that will be combined with the general color of the Christmas tree, we knit a trunk. We start with a ring of 5 vp, which we knit further in a circle, adding loops evenly until it becomes the size of the bottom. Then we stop adding loops and knit in a circle, tying the bottle to the very top. Where it narrows to the neck, we reduce the loops so that the knitting is tight-fitting.


We collect the Christmas tree. Using hot-melt adhesive, we place pompons on the barrel, close to each other, so that there is no empty distance between them. The last tier is the crown of the Christmas tree, two pompons that close the lid of the bottle. The bonding of the pom-poms to the knitted base is very durable.


It remains to dress up a fluffy beauty.
We attach Christmas tree beads. So that they sit more reliably, we glue not only the beginning and the end, but also a few beads in the central part.
A bright accent will be satin bows. We tie small bows of red ribbon and glue them to the fluffy sides of the Christmas tree. The crown is also made of satin ribbon, tied with an arbitrary shape of a bow, and glued to the top of the tree. If desired, the bow can be decorated with something else from shiny little things.
Next up is the Christmas tree balls. This role will be played by marbles glass balls. With the help of hot glue, they are thoroughly fixed to the threads of yarn, you can not be afraid that they will come off.
If you still have any “elegant things”, beads, buttons or large sequins for decoration, we also fasten them with a drop of hot-melt glue to free places.

Here is such a beautiful Christmas tree with delicate fluffy paws and bright decorations in the end.


Share
Pin
Tweet
Send
Share
Send

