Share
Pin
Tweet
Send
Share
Send
Therefore, it would not be bad to know their device and methods for resolving minor problems, without resorting to specialists. Although there are so many "specialists" with a dubious reputation who have now divorced so much that everywhere, just masters. But in the end, we get a tablet with even bigger problems, or we pay an exorbitant price to fix the banal problem.
It's no secret that many do not even know how to remove the back cover of the tablet, at least in order to assess the condition of the battery.
This article will describe the method of disassembling and repairing one of the tablets, but the principle and the tools used do not have much difference with the same operation with other devices.
So, we have a tablet in front of which, after a fall, the screen does not glow when turned on, although it makes sounds of starting and pressing keys.
Externally, the touchscreen and the screen matrix does not have cracks and smudges. We are trying to remove the back cover.
For this, the masters use a pick - a triangular plastic tool with sharpened corners. If not, then you can use the old bank card or a piece of plastic ruler with sharpened and rounded corners. The photo shows that such a homemade tool is used.
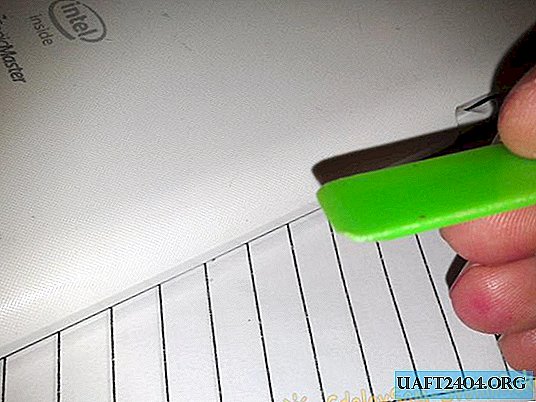
If everything is done correctly, it will not leave a trace of your interference on the tablet case.
Never use a screwdriver or anything metallic for this purpose. The consequences will be disastrous, ranging from chipping and broken off latches, to damage to the loop, matrix and other "guts" of the device.
So, we put the tablet on a previously prepared clean and flat surface, face down. The surface may be a glossy magazine laid on a desk.
If he has a decorative cover that covers the slots with SIM cards and memory cards, you should open it and take it to the side.

As for the cards themselves, they need to be removed. Otherwise, either they or the slots for their installation will be broken.
Next, we take our prepared line and try to insert its sharpened face into the gap between the cover and the upper part.
This must be done carefully without strong pressure. Just carry out the connection from one side to the other.

In order not to damage anything inside the tablet, when passing the mediator inward, hold it with your fingers 1-2 mm from the detachable parts. Thus, when removing the cover, the fingers will act as a stopper.
We carefully carry our instrument along the perimeter of the tablet without making swaying movements. You will hear the latches, one after the other, come out of the hook.
When the mediator went around in a circle and it is clear that the lid is released, carefully remove it. Sometimes for this, it needs to be slightly moved down.

We remove the cover, and before us all the beauty of the inner world of our favorite appears.


Here you can see the battery, motherboard, cables, as well as other parts of the device.
The first thing you need to pay attention to is the battery. Does it have bulges, smudges and other visible defects?
Next, disconnect the battery.

The fact is that after the fall one of the loops could lose contact, so it is necessary to revise them. Doing this with the battery connected is strongly discouraged.
Also, it should be remembered that static electricity on the human body can damage the electronics of the device, so at least periodically, before some actions with the board, touch the heating battery with your hand to remove the charge.
Most often, the battery is connected to the connector, so disconnecting it will not be difficult. Use a thin watch screwdriver or a toothpick for this.

After the battery, disconnect the small plug of the different sensors.

If they are nearby, it is better to take a picture of where that was.

Now the speaker plug.

On, off and volume buttons.

Here, pay attention to the connector itself. To pull out the train, you first need to carefully lift the white part - this is the clip. When it is raised, the cable easily leaves the connector.

It is during a fall that this part can either rise or break on one side, then the loop contact disappears, which leads to various problems.
Therefore, sometimes it is enough to pull out the cable, insert it back and close the latch.
When the latch is raised, pull out the train using the same toothpick, namely its rounded shape.
Here is a screen cable in the photo. Basically, it depends on it whether there is an image.

To get to the touchscreen loop, you have to remove the speaker. It is mounted on two screws.

Turn them off.

We remove the speaker.

Take protective tape to the side, which helps to see the sensor cable.

We release latches and we pull for this adhesive tape. Two loops will come out with him.


If desired, you can wipe the metallized contacts of the loop with alcohol - this will slightly improve contact.
Next, we do everything in reverse order. When inserting the cables into the connector, we make sure that they are fully inserted and only after that we lock them with a clip.
Lastly, we connect the battery.
Before you put on the cover, you need to check the tablet and only if everything is fine, close it. It is easy to do. Put the device on the same surface and apply the cover exactly along the perimeter. Then evenly push along the edge until a characteristic click is heard.
Very often, the repair procedure described above returns the tablet to its original working condition. This is certainly not a panacea, but worth a try.
Share
Pin
Tweet
Send
Share
Send