Share
Pin
Tweet
Send
Share
Send
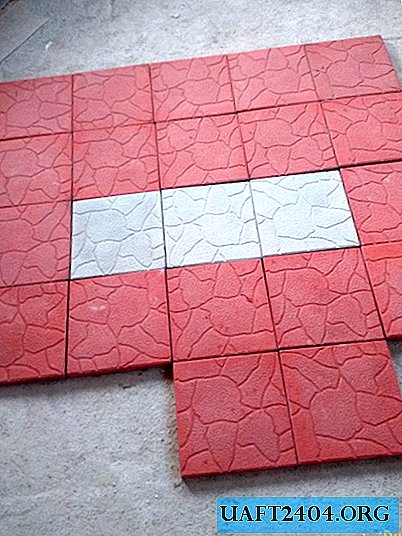
Next, I studied the options for the proposed forms. He dwelled on those of them that are useful to me for personal use. Form for sidewalk 500 * 200 * 75 millimeters. Better of course meter, but to work with her you will need a partner. For the tracks, I liked the "8 bricks" shape with dimensions of 400 * 400 * 50 millimeters. For facing the porch and blind areas I chose the Turtle shape. Its dimensions are 300 * 300 * 30 millimeters. For facing the basement, I liked the shape of the stone tile 270 * 190 * 20 millimeters.
When choosing forms for the manufacture of tiles, he paid attention to the larger size. I did not consider "brick" type tiles and the like because of the greater complexity of the manufacturing process. At the same time, large tiles are difficult to carry.
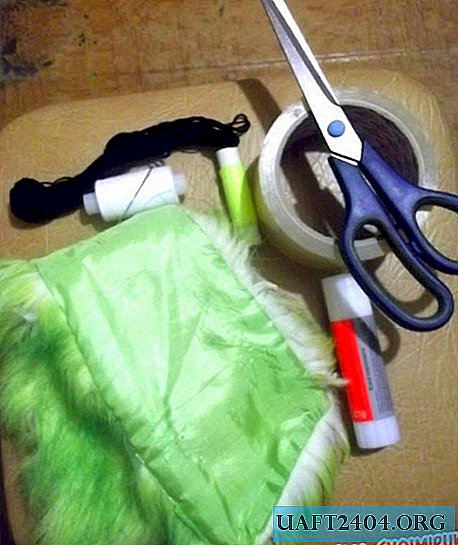
In addition, for the manufacture of tiles you will need a concrete mixer, trowel, spatula, buckets, a sieve for sifting sand. Of the materials you need a sand-gravel mixture, cement m-500 without additives, water, plasticizer s-3, grease for molds, shelving or a place for aging products molds. And I almost forgot, good weather with a temperature of about +10 degrees. At lower thermometer readings, a heated room is necessary.

I tried to lubricate forms with machine oil, silicone grease, sunflower oil, Ortolan grease. All of these options gave more or less shells on the front surface of the products. What did not give them a presentation. But I realized this later.
Having studied the Internet, I realized that everything can be the cause of the bubbles. For example, a plasticizer, a plasticizer reaction with grease for molds, the quality of the sand used, as well as the presence and number of pebbles in it, certain types of cement, weather conditions, improperly configured vibrating table, crooked hands and so on.

Having tried different versions of the mixtures, the time of vibration and lubrication could not get rid of sinks on the front surface. And already I thought that my homemade vibrating table was to blame. Characteristics of the engine, which did not fit the description of any requirements I read on the Internet.
I accidentally saw on the Internet another version of mold release agent. I decided to try it. And the process has begun. The recipe is simple. And its components do not need to be specifically looked for anywhere. Every house has them. This will require one part of vegetable oil, two parts of detergent and three tap water. We mix all this in a bottle. Using a spray gun and rags, apply a thin layer to the forms.
Sometimes molds become dirty and need to be washed. For this I use citric acid. I spread a 30 gram bag in a plastic two-liter bottle. All forms were not washed immediately. When discarding, I discard only heavily soiled ones. Then I pour the resulting solution into prepared forms. I give to stand for about an hour. With a clothes brush, everything is easily washed off. Then it is imperative, but without fanaticism, to rinse with clean water. Otherwise, acid residues on the mold can also produce shells on the tile.
In the future I want to try decorating the tiles through a bath with warm water. With this option, lubrication and washing of the molds are not required. Which is time consuming.
Now I’ll talk about the solution for the manufacture of tiles. Sift the sand and gravel mixture. This is especially important for products with a small thickness. For example, a decorative stone. I try to take cement from one manufacturer. Then the shade of the products will be the same. The ratio of components is: three buckets of sand, one cement, 100 milliliters of plasticizer and about five liters of water. If necessary, add dye.
Then mix until a homogeneous composition. I carry out unloading in two forty-liter construction carats. I fill the form with a solution to half. I lay out the maximum amount on a vibrating table. Turn it on for a short period. About half a minute. During this time, the mixture spreads out in shape and the bulk of the bubbles comes out. I turn off the table. Fill the solution to the brim. I turn it on again. Now longer, about two minutes. Landmarks are the same. The mixture should spread out over its entire form and get rid of the bubbles. But it should not boil. If necessary, add or remove excess solution. Turn off the vibrating table.
Using a trowel or spatula, smooth the surface. For tiles, I think it's better to use a notched trowel. We transfer ready-made forms to a rack or arrange them, for example, on the floor. Repeat the same with other forms. Do not forget to leave all tools clean.
At a temperature of about thirty degrees outside, I carried out the stripping on the evening of the next day. In other conditions, every other day. In the fall two days later.
Finished products were tested in the winter.
P.S. While the manufacturing process worked out, a number of products with sinks on the front surface were assembled. I decided to fix this as follows. He wiped the front surface with dry cement. After moistened with water from a spray bottle.
Share
Pin
Tweet
Send
Share
Send