Share
Pin
Tweet
Send
Share
Send
I was surprised at the simplicity of the battery recovery electronic desulfator. In fact, all the manipulations came down to connecting the miracle device to the battery and the restoration of sulfated plates will begin. Moreover, the battery didn’t even need to be removed from the car, unscrew the jars of the cans to drain excess gas and perform some other actions. Even connecting a charger is not required. Yes, and practically no special control is needed - I threw the terminals and go do your thing, and the device will do everything by itself.
Thanks to the device in question, you can not only restore your battery, but also carry out preventive maintenance on batteries that are still in operation. Thus, you will extend their service for years.
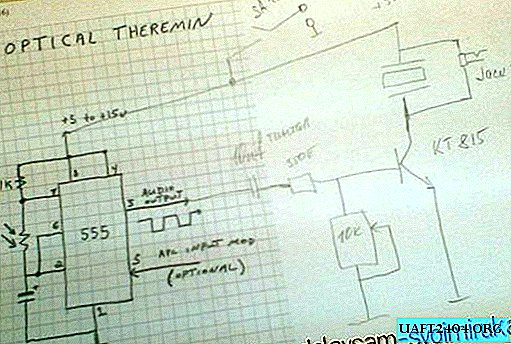
Desulfator Operation Principle
The desulfator is powered by a battery that it restores. Through the same power circuit, it generates reverse short powerful high-frequency pulses. It has long been known that such pulses introduce lead sulfate molecules into the resonance, as a result, the reverse process occurs - desulfation and the battery recovers its capacity and resistance.
Of course, this recovery method has its drawbacks: not all batteries are recoverable, but about 85 percent. And this, I will tell you, is a very good chance to try this method. Another disadvantage is the very long process of recovery, which can last from a day to a month.
Desulfator circuit

On the 555 chip, a master oscillator is assembled, which generates short pulses with a frequency of 1-3 kHz. Elements C1 and R3 filter the voltage, ensuring normal operation of the generator. The output of the microcircuit is loaded on a transistor, which commutes the inductance. A powerful short pulse arises in the L1 coil after the transistor closes. This pulse is returned back to the battery through diode D1 and capacitor C4.
Details:
C1, C4 - capacity is indicated in microfarads. C1 is better to take not at 30 uF, but at 300 uF. It is better to make C4 composite by connecting in parallel 4 capacitors of 22 microfarads, since a very large load is imposed on it.
Inductances L1 and L2 are wound on ferrite rings. It all depends on the permeability of the magnetic core and the diameter of the ring. L1 I have about 45 temples of wire 0.8 mm, and the L2 coil of 70 turns of such a wire. In general, I recommend using a tester with measuring inductance when winding coils. Rings can be taken from unnecessary computer power supplies.
D1 - any powerful 15-25 A.
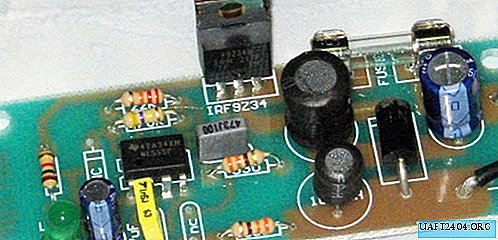
Desulfator Assembly

I assembled the circuit on a breadboard, sealed the jumpers with pieces of wire from below. The transistor installed on a small heat sink.
Then I installed this board in a makeshift case. Of course, the dimensions are oversized and the device can be made much more compact.

Testing the Desulfator
It is advisable to connect the desulfator to the battery through a fuse, so there are two amperes. Although the strength of the pulses there is much greater, but their duration is not enough to disable the fuse.
After connecting the device, you should hear a faint squeak, indicating the normal operation of the device.

Well, the final check can only be done using an oscilloscope. To do this, first connect the probes to the input of the transistor (green diagram). After making sure that the generator is working, you can connect the probes parallel to the output of the device (yellow diagram). And you will see periodic peak-like pulses, indicating the normal operation of the desulfator. At the peak, these pulses reach 30 V, and at the terminals of the battery itself. And the current strength fluctuates between 15-25 A.
Battery Recovery Process
Before recovering, it is advisable to fully charge the battery. If you are going to restore the battery on the wave, then be sure to discard one power terminal of the car so as not to damage the electronics of your car.
Next, connect the desulfator and wait. Waiting times are always individual. All that is required of you is periodic battery monitoring - voltage measurement to prevent a complete discharge. Voltage measurement must be done with the desulfator off, this is mandatory.
The maximum result can be obtained only after 4 weeks of continuous operation of the desulfator.
Although the device is autonomous, I do not recommend leaving it unattended.
Chinese desulfator

Ali Express, you can buy a ready-made kit for assembly, see - HERE.
Or a completely finished device, see - HERE.
Watch the video on the assembly of the Chinese kit
See how to set up the battery with a desulfator.
Share
Pin
Tweet
Send
Share
Send