Share
Pin
Tweet
Send
Share
Send
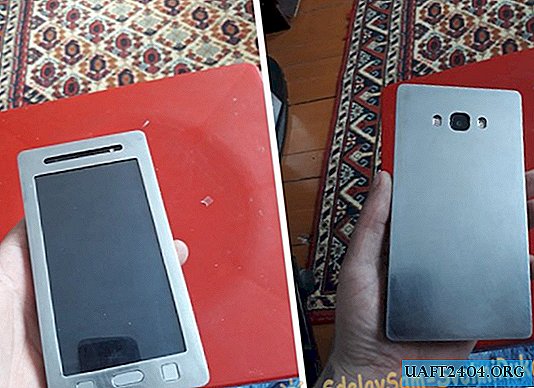
This case is not intended to be worn continuously. It is good for people whose work is associated with physical labor, or lovers of extreme camping trips, it does not carry any aesthetic functions and serves only to protect against rough mechanical impact on a fragile gadget.
To make a hard steel case you will need:
- a piece of galvanized steel.
- grinder.
- ruler and marker.
- sandpaper.
- soldering iron with tin and flux for soldering.
- Scotch.
- paper.
- transparent propylene (for the screen).
- drill.
- thin sponge.
- skin (or zam.kozh).
Making a metal case for a cell
First, take all the measurements from the phone: length, width, thickness, location from the edges of the camera, speakers, flash and keys. Transfer all the parameters to the paper.

Now we take the required size sheet of galvanized steel and glue to it, using double-sided tape, a paper template.


With a grinder, we cut according to the template the walls of the future cover - front, back, and a long strip for the end walls. It is not necessary to bring everything up to a millimeter with a grinder - it is long, difficult and tedious. Cut approximately along the contours, and then bring to the ideal with a file. In places of the camera, speaker and other things, we drill holes and also, with a file or file, we bring to the necessary parameters.

Now you need to remove the galvanizing layer from steel from the front sides of all the workpieces. Again, using a grinder and coarse sandpaper, remove the zinc layer. After removing the zinc layer, change the emery wheel to a circle of finer grain size and grind the workpiece. Do not forget about the end strip! Personally, I was too lazy to make holes for the volume and power keys in it, but I just downloaded the necessary widgets and displayed them on the phone display. But this is an individual matter and everyone can make these keys for their convenience.
Next, using a soldering iron, flux and tin, solder the end strip and the back wall of the cover.

Due to the small thickness of the metal, this will not cause difficulties. Now paste double-sided tape on the inside over the entire area of the workpiece. We apply a thin, two-millimeter sponge so that it sticks to the entire surface.

From the skin, we cut the patch on the inside of the workpiece.

The back side with the ends is ready.
Now let's take a look at the front side. To fasten the front plate with the screen to the ends and the back, we solder corners from the same metal to it. So that they are close to the end walls inside the cover.

Next, we cut out the screen from transparent propylene, so that later we fix it with double adhesive tape to the inner side of the front billet.

We also cut out the keys (I glued them with foil), stick a regular adhesive tape to the key holes on the inside and stick on the outside of the key.

After checking that everything sits in its place as expected, temporarily remove the screen and keys. Using a grinder and a felt disk, we grind the cover to the required cleanliness.


And here it’s not so simple - at first I polished the metal to a mirror blue, but it turned out to be superfluous (at least for me), since any, even the slightest typos, fatty streaks from the skin of the fingers and other blots are noticeable on it. I had to work with my hands and sandpaper with zero grain. So I made the metal matte.
Well, that's all. The cover is ready. The weight of the phone along with such a case does not have significant changes, due to the small thickness of the metal.
Watch a visual video
Share
Pin
Tweet
Send
Share
Send

