Share
Pin
Tweet
Send
Share
Send
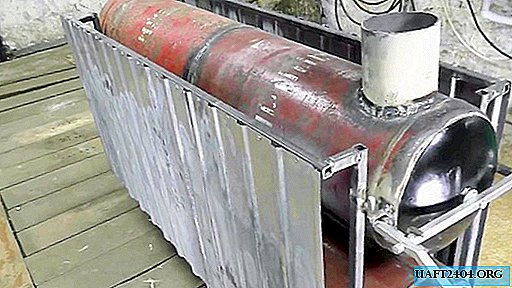
Heating garages and workshops is a big problem, which is usually solved by buying a factory solid fuel boiler. I propose another solution - the manufacture of a wood-fired heating battery from four gas cylinders. Such a stove could well provide heat to a room of 70 square meters.
Materials
- 50 liter gas cylinders - 4 pcs.;
- reinforcement 12 mm - 5 m;
- square profile 15x15 mm - 1.5 m;
- square profile 20x20 mm - 8 m;
- construction pin 8 mm - 0.4 m;
- decorative steel balls for fences and gates - 2 pcs .;
- galvanized metal profile 2x1 m - 2 sheets;
- thick-walled steel pipe 120 mm - 30 cm;
- thick sheet metal from 2 mm - 90x15 cm;
- M8 nuts - 20 pcs.;
- M8 bolts 70 mm - 4 pcs.;
- washers 32 mm - 4 pcs.
Balloon preparation
Working with gas cylinders requires strict adherence to safety regulations. This is not the first time I have been disassembling them, so I have an idea of the sequence of actions. First you need to make sure that the gas is over.
Next, you need to unscrew the cranes. This will require an adjustable wrench. To ease the effort, I put the tube on the handle of the key. It turns out a long lever, which allows you to easily twist the cranes.

It happens that the crane has become attached, and you can’t unscrew it. In this case, you have to tinker a bit. I clamp the tap in a vise, installing the cylinder horizontally, with the bottom towards me, and drill 2 through holes in the lower rim of it across from each other. I insert the bolts into them, and clamp the length of the steel chain. After that I start building scrap for the chain and unscrew the cylinder from the crane.


After I drain the gasoline from the bottom of the cylinders. This liquid substance burns no worse than gasoline, so it must be removed before work. I simply turn the cylinders over and pour the gasoline into the basin.

For the heating battery, you will need to cut the neck off all the cylinders, and for two additionally separate the bottom. In the future, the cylinders will be welded into 2 long pipes. To protect the process in cylinders, you need to fill the water to the very neck. This will eliminate the occurrence of explosive vapors.

Additionally, I always check the presence of a thin combustible film of gasoline on the surface of the water. I take the paper, dip it into the neck of the container, move to a safe distance and set it on fire. If the wet paper lights up, you need to drain the water and fill in a new one. If it’s off, then you can cut it.
Before cutting, I mark up on two cylinders. The cut-off cover will later be used as a door, so symmetry must be observed. I take a white marker and a piece of wire. Temporarily lightly screw the faucet into place to fix it, after which I attach the wire to it and draw a circle for the cut as a shoulder of an impromptu compass.


In order not to flood the floor in the garage, before cutting, I put the container in a basin. I take a grinder and carefully cut the neckline in a line. After I drain the water and still trim the lower factory weld.


In the remaining two cylinders, the cut is done only along the upper weld, I leave the bottom, since it is useful.


Battery making
Having prepared the cylinders you need to make the door. For them, I take the top covers, which I cut off according to the marker. Since they do not fit snugly against the walls of the pipe from the cylinder, it is necessary to weld a steel bar in a circle on the rim of the battery. I used 12 mm smooth reinforcement. He took a whole round, bent and cooked in place, then cut off the excess.

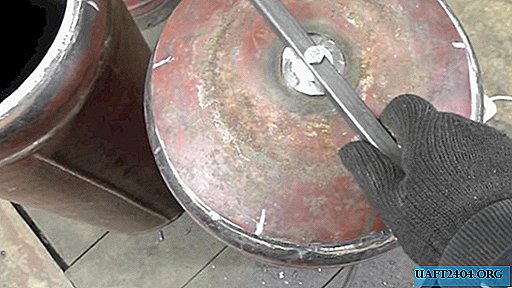
For the locking mechanism of the door, I first prepare a segment of a 15x15 mm square 32 cm long. I make a through hole in the center to fix it with a bolt to the mounting socket of the unscrewed crane.


On one side of the end of the segment I weld an M8 bolt. Since the load will go to this node, and a considerable temperature impacts, so I boil it carefully. On the second edge of the square I weld a massive door hinge from the gate.
I screw the workpiece to the door with a bolt. So that he does not fail, I put thick washers. Thin ones will not work because they burn out.


I take a thin square and make marks on it, at a distance of 10 and 19 cm from the edge. At the first, I’m not cutting to the end. I bend the square along it, as long as the incision allows. Next, cut off the workpiece at the second mark.

Again I take welding and weld an incision on a bend. I weld a steel ball for the gate at the end of the larger half. On a short bend shoulder I cook a small bar bent at 45 degrees. The angle of the rod is the opposite of the inflection of the square itself.

I make a through hole on the resulting workpiece from the side of the bar at a distance of 3 cm from the bend of the square. Next, I fix the workpiece to the welded bolt on the door.

I weld the second part of the loop onto a segment of a thin square 8 cm long and weld it to the balloon itself. Now the door can be held without problems.


To fix the locking mechanism, I also weld 2 short pieces of round timber of 6 cm to the cylinder. The parallel stand of the curtain on the cylinder serves as a guide, and the perpendicular fixes the hook of the mechanism.


After preparing two doors, you need to make an ash pan on one tank. To do this, on the sidewall, which in the future will be the bottom of the battery, do the markup. First, I draw a central longitudinal line from the top weld to the bottom, and then with an indentation of 7 cm 2 more side lines. All the lines do not bring a few centimeters to the bottom weld. Next, cut them out with a grinder. I get 2 strips of metal.


I use the resulting strips to get an ashpit. Just weld them at 90 ° along the line of the old cut.

Next, I take the sheet metal and weld it to the bottom of the resulting ash pan. I also cut 2 blanks from the same sheet to close the ends. I weld the end end from the door tightly, and I cook the front workpiece into small hinges, having received the door.

Having dealt with the ash pan, I make grate. To do this, I use 12 mm reinforcement. First, prepare a rectangular frame. To do this, take 2 segments a couple of centimeters longer than the ash pan window and 2 15.5 cm each. To fill the frame, cut reinforcement segments 13 cm long and weld in 2 cm increments.

Now I weld the cylinders into 2 pipes. I just put the cylinder with the bottom upright and point it at the one with the door. I cook thoroughly without passes.

On the far side of the pipe with an ash pan, I cut a hole for the chimney at the top. In the second pipe I cut opposite, but from below. I make a spacer from the pipe of 15 cm and weld, connecting the two chambers together. I also make a hole for the pipe in the upper chamber 20 cm from the door. I weld a 15 cm neck into it to connect a chimney.

Now I weld the legs on the sides of the cylinders. I make them from a square of 20x20 mm. I cook 4 vertical legs of 90 cm, with a pair of spacers of 5 cm at 90 degrees. I fasten them to the top of the legs and the bottom for 19 cm from the floor. Between them I already weld 4 large squares for rigidity. My length was 137 cm. They will also be used to fix the deflector.

I attach a galvanized metal profile for fences to the sides. It will provide more effective mixing of hot and cold air in the room.


In the end, it remains only to solve the problem with the adjustment of the blower. I just welded an ordinary M8 hairpin to the loop of his door. Then he bent it at 90 degrees near the leg, passed the washer and welded it at the beginning of the leg, after having screwed 2 nuts as a limiter between the loop and the washer. After that he put a spring, a washer on the stud and tightened it with nuts. The compressed spring prevents the door from twisting on its own. He screwed the remaining nuts on the edge of the bend of the stud, making an impromptu handle.

It turned out that the grate fails. Just welded at their corners with antennae 2 cm long.

Now there’s nothing to improve, so you can go to the test. To flood the stove you need to open the bottom door, load firewood and light a fire. They burn and warm the lower tank. Smoke goes through the lower chamber to its rear, passes through the spacer to the upper cylinder, and is pulled out of it into a vertical chimney. Ash from firewood falls into an ash pan. I tried to throw firewood longer than a meter, they burn without problems. The result was a battery for the lazy, in which you can load not sawn logs and branches.


Watch the detailed manufacturing video
Share
Pin
Tweet
Send
Share
Send

