Share
Pin
Tweet
Send
Share
Send
In the cold season, I forgot about my balcony, and canned it, since the temperature there was almost the same as that on the street. Finally, I thought about insulating the balcony from the inside. I want to share with you what I did for this.
Even before that, I changed the window on the balcony, and put plastic with triple glazing. The balcony itself is lined with siding. First, I dismantled the inside. It was different tripe from boards and fiberboard from the time of the USSR.
Balcony insulation
For mounting the frame, I used a metal CD profile and in some places to save UD profile.

On the walls I fastened the CD profile vertically at the edges, and horizontally fastened four profiles. Two profiles were on the floor and over the ceiling and two in the middle. In those places where there was brickwork and concrete, I drilled holes for dowels with a puncher, and fastened the profile for quick installation. On one side of the balcony there was only a profile on which the siding was attached, so there everything was already ready for insulation. It is important to fasten the profile with a building level so that the frame is vertically level.
In the same way, I scored a profile on the ceiling.


To trim the profile, I needed metal scissors. I fastened the profile to each other on special metal screws. Over the ceiling, I insulated between the profiles of glass wool. Next, I put in a wire for lighting, and closed this frame with plasterboard.

Before attaching the drywall, I made holes in which I inserted the wire. Drywall is fixed with screws to the profile.
Next, I began to insulate the walls with foam.
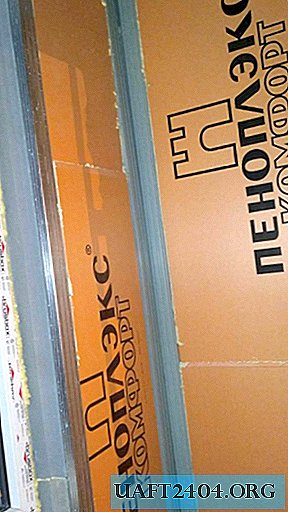


I fixed the foam sheets on the glue that is divorced with water. Since this glue dries quickly, do not knead it in large quantities. For cutting penoplex you will need a construction knife. Penoplex must be fixed to the wall so that it does not go beyond the profile level.
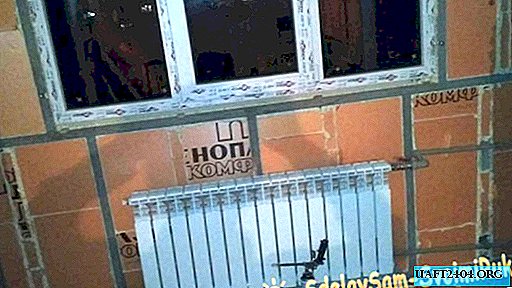
Next, I used polyurethane foam to seal the joints between the foam sheets. This is an additional insulation and waterproofing. In one part of the balcony there was a difficult place due to the pipe that passed from the battery. By the way, I carried out additional heating on the balcony, installing a battery there. In the place where the plastic pipe passed, I fastened the foam back to back to the pipe, which subsequently disappeared behind the drywall.
Then I proceeded to fasten the drywall.


As on the ceiling, drywall is attached to the wall by self-tapping screws to the profile. Please note that I fastened drywall in two layers. That is, by attaching one sheet to it, I mounted another. It is important that the seams of the two layers of drywall do not match. The second layer is also fastened with self-tapping screws, but it must be calculated so that when attaching the second sheet, the self-tapping screw does not get into another self-tapping screw when twisting.


Drywall trimming can also be done with a construction knife. Having cut cardboard on one side, the gypsum breaks off.
For the battery, I installed a pumpump heater. For ease of installation, I removed the battery. He fastened the insulation to the wall with glue, and additionally securing it with an umbrella on one and the other side of the battery.


Between the seams of the pump, I also covered with foam. It is best to use a special gun for mounting foam. It is not only economical, but also convenient, since you can use foam at any time. Conventional foam bottles must be consumed immediately.
I also trimmed the window slopes with a pumpkin.

This method of insulation is very effective, and even in winter I can go out on my balcony in a T-shirt and not freeze, as it was before. Some people lengthen the rooms due to the balcony, and this method of warming with foam and two layers of drywall will also be effective in this redevelopment. After that, you can finish the walls with putty and paint them, or glue them with wallpaper.
Share
Pin
Tweet
Send
Share
Send