If desired, IKEA factory furniture can be remade to your taste. Moreover, this will require a minimum of tools. Even a beginner will be able to bring such an idea to life.

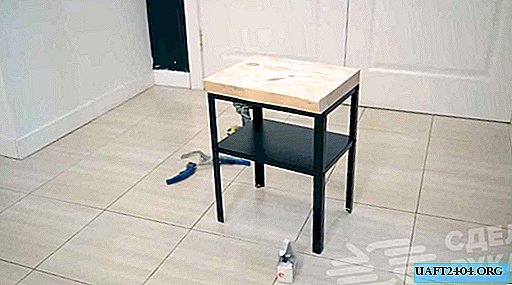
In this review, the author will talk about how to make an original wooden tabletop for the IKEA bedside table, which is made of metal. To give the countertop a more refined appearance, a brushing technique will be used.
From the main tool for this work, you need a special brush for brushing. And it is best to use it in tandem with the grinder, which provides the ability to adjust the speed.

You will also need a grinder, a screwdriver, a grinder, a clamp and a circular saw. If there is no circular, then you can use an electric jigsaw, and then level the surface with a planer.

In principle, in this case, you can use everything that is at hand. For example, instead of a grinding machine, you can use a regular wooden block, and attach a piece of sandpaper to it.
The main stages of work
For the manufacture of countertops, the author suggests using a wide pine board with an uncut edge. But, as an option, you can also glue a wooden tabletop of the required width from several boards.

First you need to cut the boards to the size of the countertop. It’s advisable to cut the places with a planer so that the workpieces better stick together. After gluing, the surface of the countertop is leveled with a plane. You need to cut the fibers at an angle of 45 degrees.
After that, you can proceed directly to the process of brushing the countertops. By the way, pine is excellent for brushing, because it has not only an interesting pattern, but also soft and hard fibers in the structure itself.

The very meaning of the brushing process is to select soft fibers with a brush and leave solid ones, which will create an unusual and beautiful wood pattern.
After brushing, a layer of white putty on the wood must be applied to the surface. Why is it white? This is necessary so that the result is a pronounced contrast between the natural color of wood and putty.

The final touch - and you're done!
After applying the putty, you need to give it time to dry, and when the putty is completely hardened, you can begin grinding the countertops. To do this, you need an emery cloth or a coarse grinding disc - approximately 80.
Then the countertop is cut to the desired size, after which it is sanded with fine sandpaper and covered with varnish for water-based furniture. It is advisable to apply two layers of varnish on the surface of the countertops and ends, and only one layer can be applied from below.

At the last stage, it remains only to fix the countertop on the table frame, and you can fully enjoy the result. For details on how to make an original tabletop for the IKEA table, see the video on the website.