Share
Pin
Tweet
Send
Share
Send
This will require a small set of tools and materials.
Materials:
1. Fence (polished), the amount varies depending on the size of the table;
2. Self-tapping screws or nails (depending on which tool the work is carried out);
3. Stain and varnish of any color you like.
From the tools you will need:
1. Saw (manual, electric, chainsaw - any at your discretion);
2. Hammer or screwdriver;
3. Pencil and tape measure.
Step 1
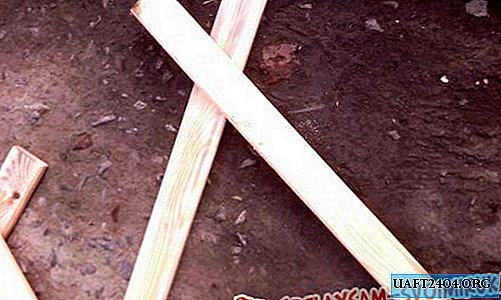
They start to make a garden table from the fence with legs, on which the whole structure will be held. Depending on the size of the table, two or more may be required. Fasten the two picket fenders crosswise with nails or self-tapping screws. This is one table leg. The second and subsequent are done similarly.
Step 2
The upper side (the place where the picket is fastened) will need to be cut off. To do this, draw a straight line for cutting with a pencil.

From how smooth this surface will be, depends on how smooth the countertop will turn out. Cut off the excess line. From below it is necessary to carry out a similar procedure so that the future table stands firmly on its legs.
Step 3
To the upper side, already sawn, it is necessary to nail another picket fence, on which material for the countertop will be stuffed in the future.

It is advisable to use nails or self-tapping screws of short length so that they do not pass through the leg. Incorrectly selected nails can lead to early table wear or splitting of wood fiber (cracks will go, the structure will be unstable). Ultimately, you should get two (or more) of the same design.

Step 4
Now you need to make a screed between the legs, so that the table turns out to be stable and strong. To do this, place the legs vertically and nail between them a couple more pickets on both sides (both above and below). Cut off the excess. The result should be a stable design.

Step 5
It is necessary to fill the picket fence on the upper side of the finished structure, which will serve as a worktop.

Tip: make a small gap between the boards so that excess moisture does not linger on the surface. If this is not done, then the absorbed moisture will destroy the wood, contribute to the development of the fungus, which significantly reduces the life of the table. If the picket fence is selected in different lengths, then it can then be gently cut, aligning the countertop.

For greater aesthetics of the structure, you can also stuff a picket around the perimeter of the countertop.

Step 6
Process the finished table with a stain and varnish from all sides. This is necessary so that negative weather conditions do not have a significant effect on the wood, preserving its condition.

Share
Pin
Tweet
Send
Share
Send