Share
Pin
Tweet
Send
Share
Send
Ready to get started?
We will prepare the necessary tools and items:
- cardboard tube
- satin fabric
- glue
- lace
- pencil
- ruler
- scissors
- threads
- needle
- beads
- ribbons for decor

First you need to determine the width of the ring. It all depends on your desire, the width can be from 3 to 6-7 cm. I will make 5 cm. We measure with a ruler 5 cm and cut off the ring. It will be more convenient to cut it with a knife, but I cut it with scissors.

We measure a piece of atlas with a length equal to the circumference of the ring + 5 mm for the allowance, and with a width two times the width of the ring.

Glue Crystal Moment I stick one edge of the satin from the inside of the ring. This is a little inconvenient to do, but be patient and glue the fabric evenly. Instead of glue Moment you can take a silicone gun. That being said, to whom it is convenient.

Then gently glue the second edge of the fabric to the inside of the ring. If the seam is not very neat, you can glue the tape on top. But it is optional. I do not do this. Here is a little ring happened.

We measure the lace. Its width is 5 cm, this is exactly what I need, the length is equal to the circumference of the ring + 5 mm for the allowance.

I apply glue on the edges of the ring on the front side and gently glue the lace.

Now we need to close the lace seam. To do this, we make a bow from ribbons. I have a chocolate-colored atlas, so I'll take the chocolate and cream ribbon. We measure a piece of chocolate-colored tape with a length of 10 cm. We bend the tape in half, measure the middle and glue the ends of the tape to the fold of the tape.

We do the same with the cream-colored ribbon, but we measure it 2 cm shorter so that the bow is smaller.

We glue the white bow on brown and sew the bead with threads. Here is the finished bow.

Glue the bow along the junction of the lace on the ring. The ring is ready, side view.

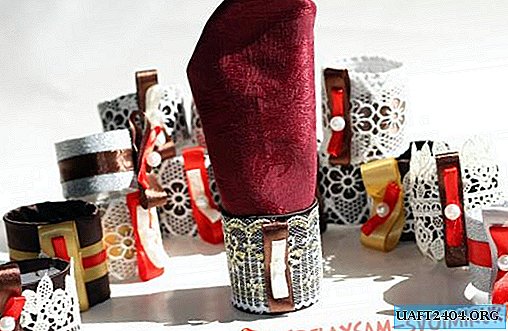
Serving options can be very many. Here are 2 of them.


Yes, and there may be many options for making the rings themselves. It all depends on what you find in the bins at home. For example, rings made according to the same principle as described in the master class, but using different lace and contrasting bows. The width of the rings is 4 and 3 cm.

These rings are also glued with lace, but different in texture. Under the lace ring is glued with ribbons.

Here is a ring glued with 2 rows of lace. It seems to me that it looks very elegant, especially if you have a lace tablecloth.

Here is a narrow ring on a napkin, the width of the ring is 3 cm.

Rings glued with ribbons and lace on top, ring width 3 cm.

Contrast of different ribbons in color and texture.

And finally, rings glued with satin and ribbons.

These rings will also help you with stylized parties. They can be made in one color scheme and not limited to ribbons. It all depends on your imagination!
Share
Pin
Tweet
Send
Share
Send