Share
Pin
Tweet
Send
Share
Send
The fabric is thin linen. I also needed a piece of white cotton for ribbon, doublerin and felt for decoration. For the manufacture of a children's headgear, only one measurement is needed - the circumference of the head (in a child 2-3 years old - about 50 cm). Also from paper you need to make three patterns (paper patterns). If the baby, for example, has last year’s panama hat, which has become small for him, then you can take measurements from her by slightly increasing the size. First, we build a rectangle - a pattern of the middle part of the panama. The length of AA1 is equal to the circumference of the head (on my pattern - 53 cm), the height AB - 7-8 cm. The latter value is arbitrary and is approximately equal to the height of the child's forehead. The main thing is that the panama hat does not fall into the eyes, but is not too short.

Then we postpone 1 cm from points B and B1, shortening the segment BB1 by 2 cm. Divide the segment AA1 in half and lower the perpendicular from point A2 (the middle of the segment) to point B2. Divide the resulting new segments in half and draw perpendiculars a2b2 and a3b3. Set aside 1 cm from the points b2 and b3 and connect the points b4, b5 and b6, b7 with the points a2, a3, respectively. The tucks turned out. Thus, the upper part of the pattern (segment BB1) will be 6 cm shorter than the lower part (AA1). And the panama upward will narrow slightly. The next pattern is the top of the panama. To do this, draw a circle on paper with a circle equal to approximately 47 cm (53 cm - 6 cm). Panama fields consist of four identical patterns - two front, two wrong. To do this, draw the following pattern.

Draw a rectangle. CC1 = 26.5 cm (half the size of the head circumference), CD = the desired field width (in my pattern - 6 cm). Divide the segment CC1 in half and lower the perpendicular, extending it beyond the segment DD1. The intersection points are denoted by c2 and d2. From these points we lay down 3-3.5 cm down and put points c3 and d3. First, connect the points C, c3, C1 with a smooth line, then the points D, d3, D1. Such paper patterns need 4 pieces.
We lay out the patterns on the fabric and circle the chalk.

We cut out the details, not forgetting to leave allowances for the seams. We make tucks in the middle part. We sew the middle part (its short edge of 47 cm) with the top. And first we usually shorten it - fabric to fabric, and then we slightly impose the upper edge of the middle part from the face onto the top of the panama and sew it again.

Turn the product inside out. From the doubler, we cut out a circle and a strip of the same size as the stitched parts of the panama. We sew them on the wrong side - the hard side of doublerin inside.

We bend the edges inward and cut down so that they do not scrub.

Now we make blanks for the panama fields - we fold paired parts with their faces facing each other, put a doublerin strip on top and sew them along the lower edge.

When we turn the fields to the front side, the doubler will be inside. We sew the fields to the panama, we put the joints on top of each other. Try to ensure that the joints of the fields coincide with the side seams (tucks) of the panama. Then in the panama fields we make a few more lines - so they will look prettier, and they will also become tougher.

From the inside, the panama hat is completely seamless.

Sew on loops (loops for threading the tape) - one on the back and two on the sides.

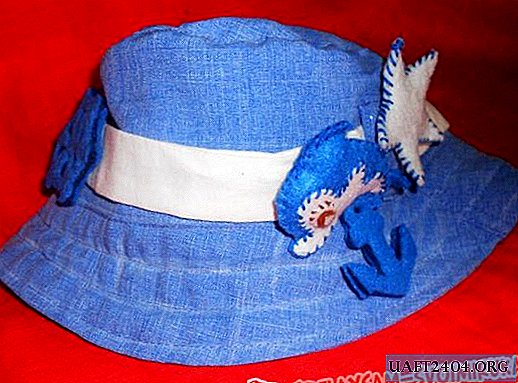
However, the panama hat can be left without loops, and without decorations - the headpiece is already ready. But things on the child always want to decorate with something sweet and cute. As such an ornament, I made a ribbon of white cotton and felt toys - a dolphin, a starfish, an anchor and a helm. I did not sew on the tape, but made it on a button so that it could be unfastened or washed separately, for example.

Share
Pin
Tweet
Send
Share
Send