Share
Pin
Tweet
Send
Share
Send
Will need
The following tools and materials will be needed:
- Screwdriver (corresponding to the screws used in the device).
- Grinding machine with cutting wheel.
- Ruler.
- Marker.
- Small hinge (for door).
- Wood screws.
- Drill.
- File.
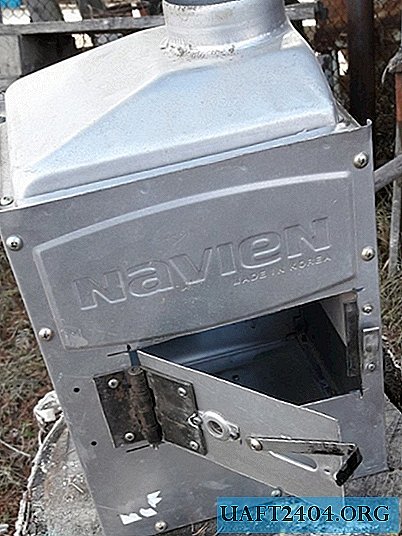
Making a mini-furnace from a gas boiler
To get to the combustion chamber, I had to disassemble almost the entire boiler into its components and take out all the contents. However, I only needed a Phillips screwdriver for this! But if you work with a screwdriver, then it will take quite a bit of time. The combustion chamber of the wall-mounted boiler is quite small, relative to the boiler itself. For example, I have it with dimensions of only 35 x 25 x 25.

In addition (which is especially convenient) such cameras already have a pipe outlet.

The combustion chamber itself is also disassembled. It is fastened with screws and consists of removable walls, water heating elements, fireproof protection from asbestos shields and gas nozzles.

We disassemble the combustion chamber, remove everything internally, contents unnecessary to us, and assemble the walls with refractory shields back.

Now we need to cut the door to supply fuel (logs, wood chips or coal) to the furnace. To do this, on the front wall, using a ruler and marker, we make the markup of the required area.

To determine exactly the front wall, I took into account its most convenient lateral location from the pipe outlet, as well as the presence of an eye made of heat-resistant glass, overseeing the combustion of fuel. Now we take a polishing machine (do not forget about goggles!) And carefully cut the door according to the marking.

Conscientious manufacturers, as a rule, make such combustion chambers of special, refractory metals, such as titanium, so when cutting, you will have to be patient and, just in case, prepare a spare cutting wheel. After the door is cut out, we allow the whole thing to cool on its own. In no case do not water it! It is important! Sudden cooling can disrupt the structure of the alloy of which the chamber consists, which will lead to its deformation during further operation! The alloy for such products is designed for independent, natural cooling. After the metal has cooled, we clean the edges of the door and the hole for it in the chamber wall with a file from the burrs. Next, on the door and the wall we mark with a marker under the hinge. We drill holes.

We also drill holes on the door for attaching the gate valve. Still need holes below, under the door. They will serve to supply air to the furnace (a kind of blowing). If necessary, install the legs, in the bottom of the chamber at the corners we also drill holes of the required diameter.
We will also need a rectangular piece of metal to make a strip that will cover the gap between the door and the wall from the inside, so that the door does not go into the furnace when it is closed. To do this, cut off a piece of metal of the necessary parameters, in which we also drill holes for attaching to the wall from the inside.
After the drill is finished, we assemble everything into a single whole, with the help of small bolts with nuts, a screwdriver and a wrench of the corresponding number.


Now go to the pipe. Such pipes for the removal of combustion products from gas boilers, usually go double. This is the so-called "turbo pipe". That is, there is another one inside the pipe - exhaust comes out through the inner pipe, and cold air enters the boiler through the outside pipe to cool the system. In this case, it is very useful to us, for additional thermal insulation. To do this, simply fill the space between the pipes with some heat-resistant filler. Now you can not be afraid that the heat from the pipe will melt the ceiling of the tent or greenhouse.
As I already mentioned, there is already an outlet for the pipe in the combustion chamber, so all we have to do is fix it accordingly.

It is easy to install and just as easy to remove, which is very convenient during transportation. If desired, it is possible to install rain protection at the top of the pipe so that it does not pour into the furnace when it will not be used. Such an oven can easily fit in the trunk of any car, it is not heavy, compact. It will warm in bad weather and give comfort in your tent.
Share
Pin
Tweet
Send
Share
Send

