Share
Pin
Tweet
Send
Share
Send
Liquid acrylic is a modern material with which you can perform a quality restoration of the bath with your own hands. It consists of a base having a sufficiently high density, and a hardener. It can be used for restoration of steel, cast-iron and acrylic bathtubs.

Materials and tools
For the restoration of the bath, liquid liquid acrylic, detergents for cleaning plumbing and degreasing, and soda will be required. Please note that liquid acrylic is sold in containers designed for bath sizes - 1.2, 1.5 or 1.7 m.

Need to prepare a tool for work:
- grinder;
- drill;
- whisk nozzle;
- pliers;
- sandpaper of various grain sizes;
- rubber spatula;
- respirator;
- a vacuum cleaner;
- sponge;
- gloves
- flashlight.

When using a drill to grind the surface of the bath, a special nozzle is required.
Note: a building hair dryer and a stationery knife are useful for removing non-factory enamel if the bath has already been restored to it.
You also need polyethylene to protect the floor and walls (rags or newspapers can be used).
Bath preparation
The appearance and service life of the applied coating will depend on the quality of the preparation. First, overflow and drain are removed. A grinder or a drill with a nozzle for grinding must carefully treat the surface of the bath. To do this, use sandpaper for rough work 40-N or 32-N (according to GOST 3647-80). Emery will also help remove water deposits. The surface after grinding should be roughened to ensure good adhesion of liquid acrylic.


Note: non-factory enamel, previously applied for the restoration of the bath, is removed with a clerical knife after heating with a hairdryer.


The bath needs to be cleaned and rinsed off with debris. Then the surface is treated with a means for cleaning plumbing - the spilled product must be distributed with a sponge over the entire surface of the bath, including the installation location of the removed overflow.
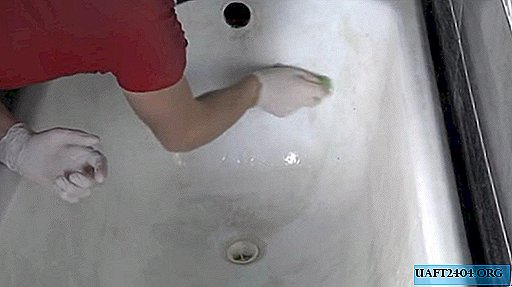

The bath is washed again and left to dry. After drying, proceed to the next important stage of work - degreasing. Soda is poured into the bathtub and rubbed with large sandpaper thoroughly over the entire surface.

Maybe degreasing will need to be carried out not once, but two or three times. It is necessary to work with gloves. Then the bath is thoroughly washed with a stream of water from the shower.

Before starting the next stage, you need to remove the siphon.

The place to install the siphon needs to be cleaned, degreased and rinsed with soda residues.

The mixer and shower are covered with a bag and fixed with adhesive tape - water should not get on the applied layer of liquid liquid acrylic until it completely dries. Tiles and shelves above the bathroom with a rag are cleaned from dust particles. Do not allow dust from grinding to get on acrylic.


After completing this step, the bath must be thoroughly dried with a hairdryer. Particular attention is paid to places where water can collect: the joints of the tiles and the bath, under the side that is installed at the junction of the tiles and the bath. It is better to remove the side and restore the bath without it. The cement joints at the junction with the bathtub are well dried with a hairdryer.


To eliminate defects in factory enamel (cracks, chips), a quick-drying car putty is used.

The composition is stirred and a rubber spatula is applied to the damaged areas, and then allowed to dry.


While the putty dries, they cover the floor under the bathroom and the tiles at the joints with polyethylene or newspapers, which are attached with tape.

So when pouring liquid acrylic will not spoil the floor and wall tiles.
After the putty dries, these places pass with fine sand paper. Vacuum clean the dust particles from the bath.

Means for degreasing (acetone) wipe the fillings of cracks and chips. Wipe with acetone also need to place the overflow and siphon. A container is installed under the drain hole (you can use a cropped plastic bottle). Excess liquid acrylic will drain into this container.

Coating
After completion of the preparatory work, they begin to prepare liquid acrylic. Hardener is added in parts to the material and mixed thoroughly with a drill with a whisk.

It is necessary to achieve complete mixing of the two components, not forgetting about the material in the corners and at the bottom of the jar with liquid acrylic. Otherwise, the applied acrylic layer will dry unevenly. Stir the composition for 10 minutes.
Important! Do not forget about the shelf life of the finished mixture, which is indicated on the package. During this time, you need to completely complete the work.
Before pouring, the composition is allowed to stand for 5-10 minutes. To work, you need a plastic container in which acrylic is poured. You can use a cropped and well-worn hardener bottle. The work is done with medical gloves.
Note: the addition of color paste will allow you to get the desired color of the composition. Color paste by weight should not exceed 3% of the total weight of the composition.
The composition is poured along the perimeter of the bath from top to bottom.


Dropping below, they help themselves with a rubber spatula, with which acrylic is rubbed into the surface of the bath. Having achieved full coverage with liquid acrylic, a spatula make zigzag movements along the bottom of the bath. Then the composition is leveled by even movements from the wall towards the drain.


The bath is left for 5 minutes. The light is turned off and with the help of a flashlight the surface of the bath is checked for defects or irregularities (smudges) that need to be leveled with a spatula.


Important! When mixing the composition, air bubbles could form. To remove these bubbles, the surface of the bath is swiftly blown with a hairdryer at low speeds.
After 10 minutes using a flashlight, the surface is checked again. The bathroom can be used 24-48 hours after complete drying. Up to this point, the bathroom should be closed. The drying time of the composition depends on the technical characteristics of the material and the temperature regime in the room.
Note: some modern liquid acrylics dry 12-16 hours.
Work summary
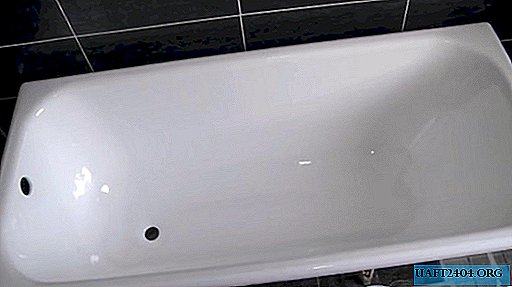
As a result of the work done, you will receive a fully restored bathtub with an excellent appearance, which is guaranteed to last at least 10 years. After each use, the bath should be washed with special acrylic care products, dishwashing detergents or liquid soap.
Advantages and disadvantages
The advantages of liquid acrylic bath restoration:
- long service life;
- beautiful appearance;
- smooth surface;
- excellent performance, primarily mechanical strength;
- the possibility of re-restoration in the future.
The bath after restoration will practically not be inferior to the new bath.
The disadvantages of this technology include:
- the long time it takes for the surface to completely dry;
- specific smell when applying and drying liquid acrylic;
- the need to purchase bath care products.
Tricks at work
A high-quality bath surface will be obtained when applying the composition with an even thick layer. Acrylic must drain down independently. Determine the middle of the side slopes by eye and pour a second portion of the composition onto them. The remaining material is poured to the bottom. So the entire surface of the bath will be covered with a thick layer of acrylic.
Share
Pin
Tweet
Send
Share
Send